Word templates allow one-click document generation, automatically populated with Dynamics 365 data.
Tip
This feature generates documents, from a template, one record at a time.
For bulk document generation please see the Mail Merge Process article.
Supported versions of Word
| Task | Word Version |
| Creating a template | 2013, 2016 |
| Using a template | 2010, 2013, 2016 |
Personal vs System
There are two types of templates, personal and system.
Personal Templates - All users can create, are visible only to themselves, but can be shared.
System Templates - MiiiA Admins can create, are visible to everyone.
Link
For more info on managing Personal Templates, see the Personal Templates article
Create A Template
Depending on your role, there are three locations you can create a new template:
Important
You must create a blank template via the below process first, before adding your own content. The blank template contains some hidden coding allowing it to be re-uploaded later. Once you have this blank template you can cut/paste your own content from an existing document if need be.
-
For Admins - Go to Settings > Templates > Document Templates > New
 . You’ll need sufficient permissions to access to the Settings page and create System Templates, visible to everyone.
 -
From a record. Open a record such as an Contact. With the record open, click More
 > Word Templates > Create Word Template. Templates created here are personal and available only to yourself, unless shared.
 -
From a list of records. For example, go to Sales > Contacts > Active Contacts. Select a single Contact, and then click More
> Word Templates > Create Word Template.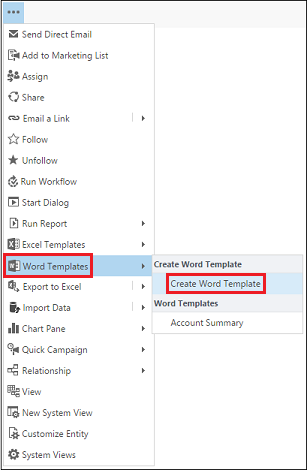
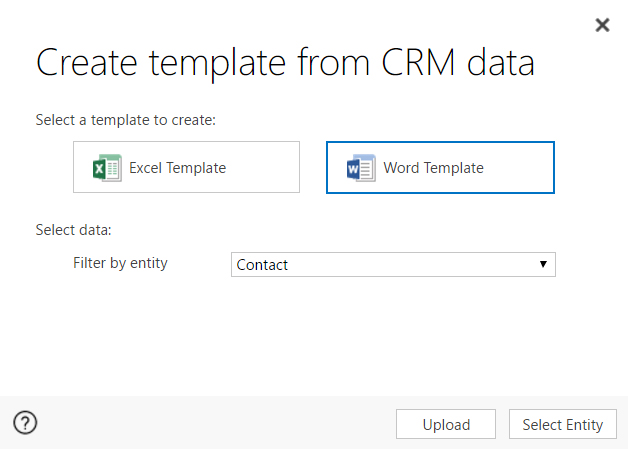
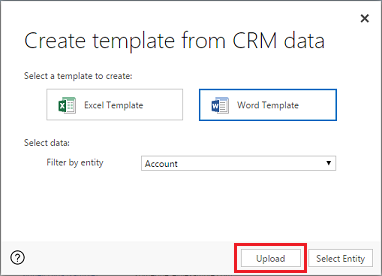
- Select Word Template
- Filter by entity will show what record types you will be working with
- Click Select Entity to proceed
Choose Any Related Record Types
The relationships you select on this screen determine what other related record fields are available later when you define the Word template.
eg. If you only require fields from the main entity, Contact, you don't need to select anything.
eg. If you do need data from a Contact's Files, Activities or Policy Numbers you will need to select those from the 1:N Relationship section.
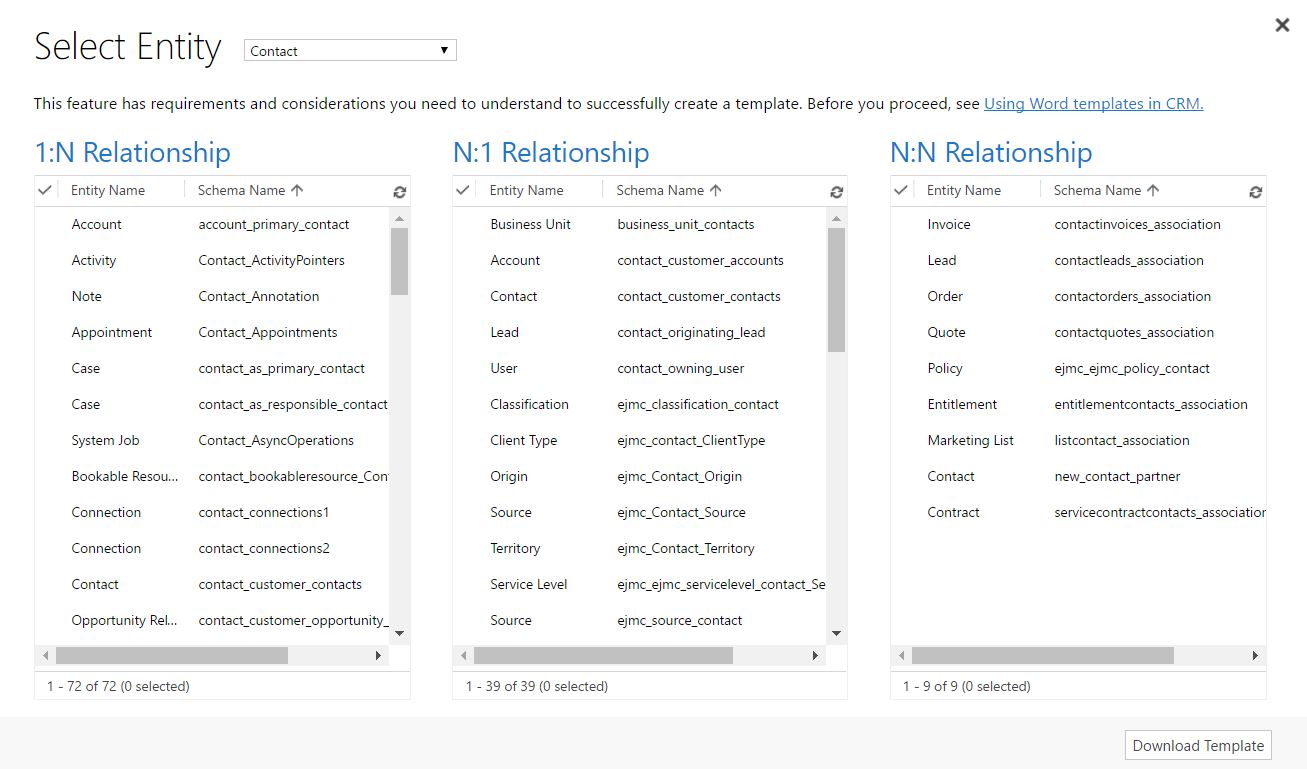
What are 1:N, N:1, and N:N relationships?
This screen requires an understanding of your Dynamics 365 data structure.
|
Relationship |
Example |
|---|---|
| 1:N (one to many) |
one Contact can have many Files |
| N:1 (many to one) |
many Contacts can be assigned to one User |
| N:N (many to many) |
one Contact can belong to many Marketing Lists. one Marketing List can have many Contacts |
Info
There is a limit of 100 related records returned for each relationship. eg. You export a template for a Contact's related Transactions, the result will return a maximum of 100 Transactions only.
- Click Download Template
- a Word file will be downloaded to your PC for editing
Enable Developer Tab
- Open the "blank" Word template file
- Go to File > Options > Customize Ribbon, and then enable Developer
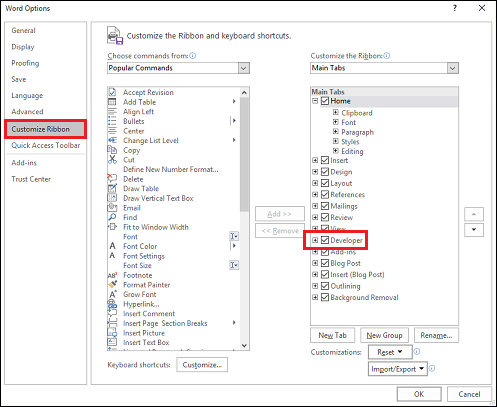
- Click OK.
- Developer now appears in the Word ribbon

A Known Issue
In the next section, you’ll be adding XML content control fields to the Word template as placeholders for dynamic data from your CRM.
Critical
A few things can cause Word to freeze, requiring you to use Task Manager to stop Word:
-
You insert a content control other than Picture or Plain Text.
-
You make a textual change, such as changing the capitalization or adding text, to a content control. These changes can occur through AutoCorrect as well as user edits. By default, Microsoft Word AutoCorrect capitalizes sentences. When you add a content control field, Word sees it as a new sentence and will capitalize it when focus shifts away from the field.
To prevent issues with control fields, do the following:
Only add fields as Plain Text or Picture
- You use the XML Mapping Pane to add Dynamics 365 entity fields to your Word template. Be sure to only add fields as Plain Text or Picture.

Do not make any textual changes to the added content control
- You can make formatting changes to content control fields, such as bolding the text, but no other textual changes, including capitalization changes.
If you experience Word freezing or performance degradation, try turning off AutoCorrect.
To Turn off AutoCorrect
- With the template file open in Word, go to File > Options > Proofing > AutoCorrect Options
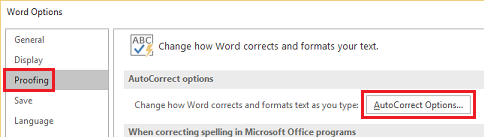
- Deselect Capitalize first letter of sentences and
Automatically use suggestions from the spelling checker.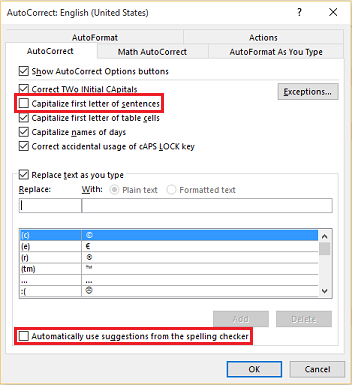
- Deselect Hyphens (--) with dash (-) on the AutoFormat and AutoFormat as You Type tabs.
- Click OK.
Setup The Template
Use the XML Mapping Pane to define the Word template with Dynamics 365 entity fields.
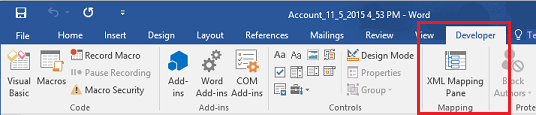
- In your Word template, click Developer > XML Mapping Pane.
- The default XML schema is selected.
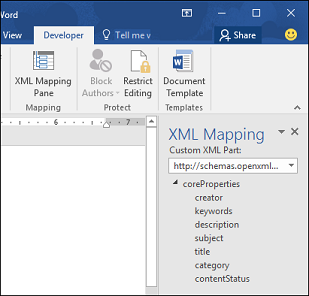
- Select the Dynamics 365 XML schema.
It will begin with urn:microsoft-crm/document-template/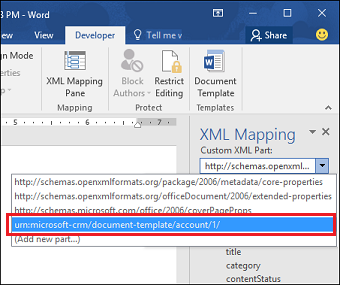
Important
If you have frequent accidental edits that cause Word to freeze or have performance degradation, be sure to turn off the AutoCorrect options shown here: A Known Issue
-
Expand the Dynamics 365 entity, right-click the entity field
-
Click Insert Content Control > Plain Text
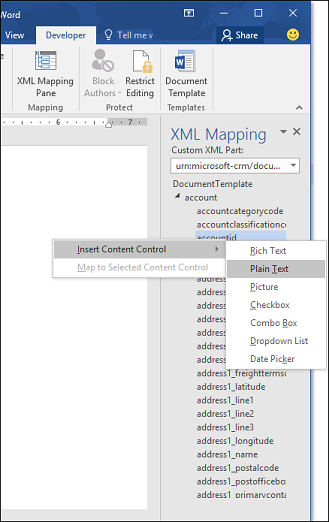
- The Dynamics 365 entity field is added to the Word template
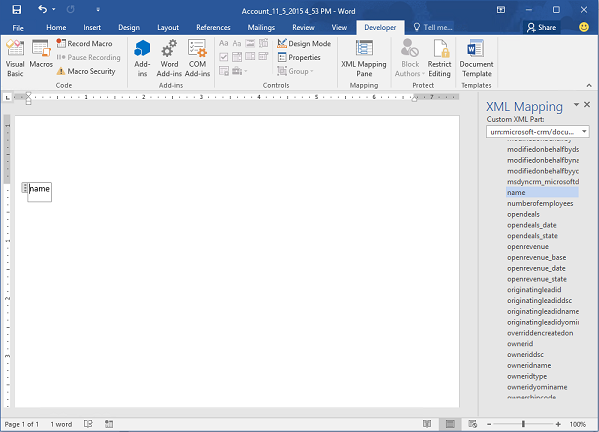
- Add additional entity fields, add descriptive labels and text, and format the document.
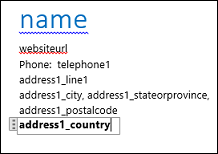
A completed template might look like this: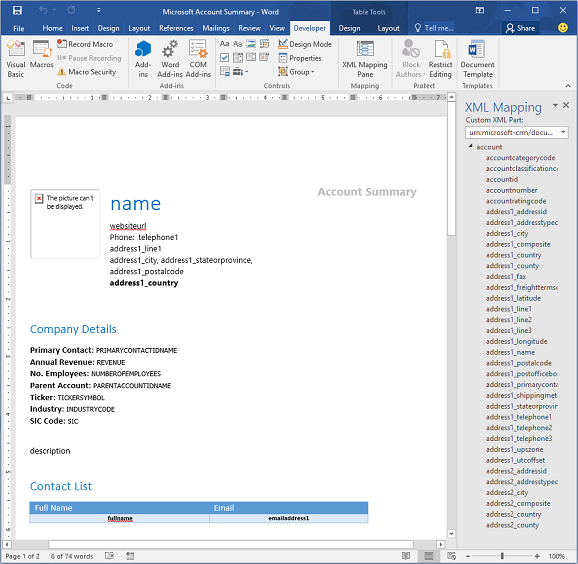
Set content control fields to repeat
Some content control fields you entered likely have multiple lines of data. For example, Contacts have more than one File. To include all the data in your template, set the content control field to repeat.
-
Put fields with repeating data in a table row.
-
Select the entire table row in the template.

-
In the XML Mapping Pane, right-click the relationship containing the content control fields, and then click Repeating.
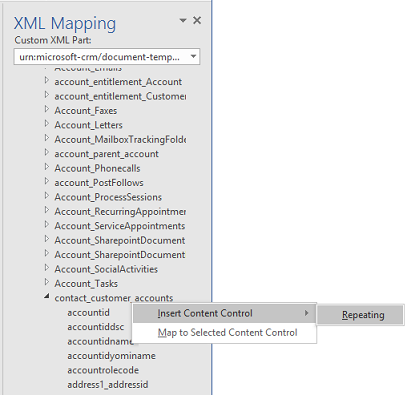
When you use the Word template in Dynamics 365 to create a document, the table will populate with multiple rows of data.
When the template has the fields and formatting you want, save it and upload it into Dynamics 365.
Upload The Template
When you have your Word template built the way you want, save it so you can upload it into Dynamics 365.
Access to the newly created Word template depends on how you uploaded it and to the access granted to the security role.
MiiiA Admins can use the Templates link in the Settings area to upload the Word template. A template uploaded in Settings is available to all users in your Dynamics 365 organization.
For Admins: Upload the document as a System Template
- Go to Settings > Templates > Document Templates
- Click Upload Template
-
Drag the Word file in the dialog box or browse to the file
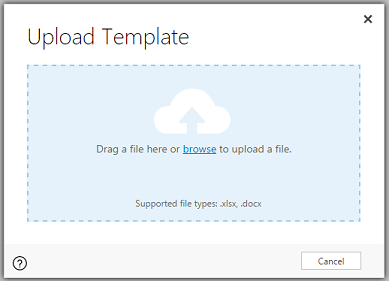
- Click Upload
Non-admin users can upload a template for their own use from a list of records.
For non-admins: Upload the document as a Personal Template
- Open a page with a list of records, for example, the list of Contacts in Sales > Contacts
- Select a single item such as an Contact, click More (…) > Word Templates > Create Word Template
-
Click Word Template > Upload
- Drag the Word file in the dialog box or browse to the file
- Click Upload
Using The Template
To use the Word template you’ve created, do the following:
- Open a record with information you want to create a document. For example, open a customer account record in Sales.
- Click More > Word Templates, and then under Word Templates select the template you created
If the template you created is not visible, there are two possibilities:
- Only templates built for the selected record type (entity) will be displayed. Also, only System Templates made available by Admins, or your own Personal Templates will be available.
- You need to refresh Dynamics 365 to see the template. Either refresh your browser or close and reopen Dynamics 365.
After you select your Word template, Dynamics 365 creates a Word document from the record you selected.